模型导出ckpt,pb文件与predict.py实现
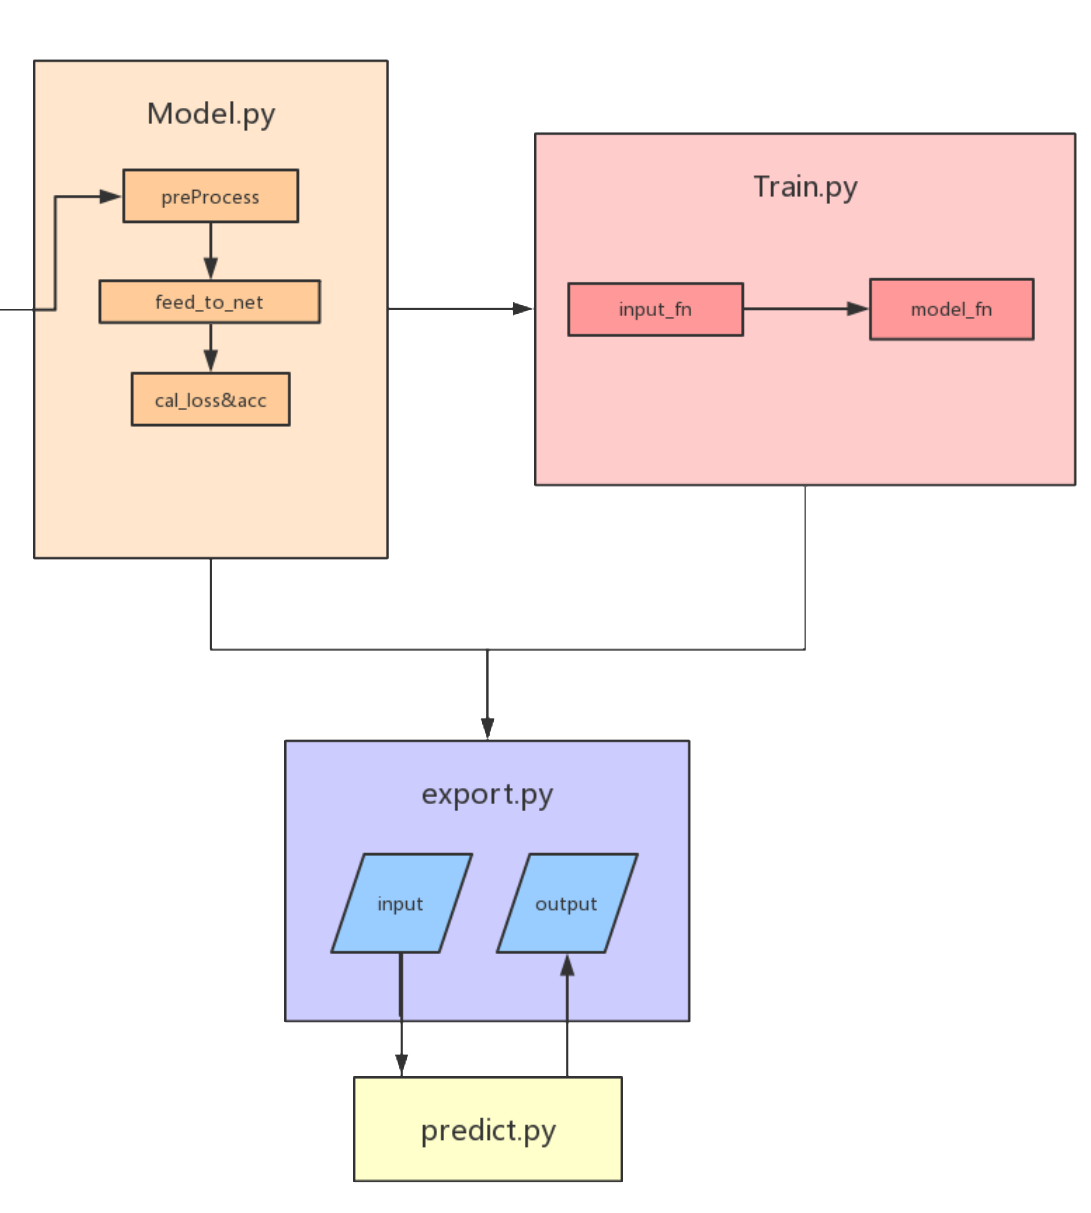
1.模型导出
在前面我们使用了官方给的库文件进行模型的预训练,在训练结束后当然也要进行模型的存储
1. 设定进行模型的保存时长
1
2
3
flags.DEFINE_float('keep_checkpoint_every_n_hours',
                   0.1,
                   'Save model checkpoint every n hours.')
利用saver模块,直接进行参数传送
1
2
3
4
5
keep_checkpoint_every_n_hours = FLAGS.keep_checkpoint_every_n_hours
saver = tf.train.Saver(
            sharded=True,
            keep_checkpoint_every_n_hours=keep_checkpoint_every_n_hours,
            save_relative_paths=True)
2 ckpt文件和pb文件的区别
ckpt文件是需要模型来支撑的,而pb文件是将模型一起集成好的存储下来的
要使用ckpt文件就必须把网络模型还原,然后进行sess.run()操作进行实现
而pb文件只需要提前定义好,输入和输出节点,接着直接运行就好了,不需要复现网络
所以这两者,各有好处!
因此,我们需要对这两个文件都进行学习,掌握,不过都比较简单
3 从 .ckpt 格式转化为 .pb 格式
在训练时,我们一般都会采用ckpt格式进行加载和存储,但是在项目成型之后我们就可以直接使用pb文件来进行验证,这里我们借鉴tensorflow官方转化实例,来进行复现。
在转化时,主要实现一下两点:
- 定义数据入口
- 定义结果出口
在export.py中定义输入占位符
1
2
3
4
5
6
input_placeholder_fn_map = {
    'image_tensor': _image_tensor_input_placeholder,
    'encoded_image_string_tensor':
        _encoded_image_string_tensor_input_placeholder,
#    'tf_example': _tf_example_input_placeholder,
    }
然后要定义输出符号,这个是网络生成的,所以不用占位
1
2
3
4
5
6
7
8
9
10
11
12
13
14
15
16
17
18
19
20
def _add_output_tensor_nodes(postprocessed_tensors,
                             output_collection_name='inference_op'):
    """Adds output nodes.

    Adjust according to specified implementations.

    Args:
        postprocessed_tensors: A dictionary containing the postprocessed
            results.
        output_collection_name: Name of collection to add output tensors to.

    Returns:
        A tensor dict containing the added output tensor nodes.
    """
    outputs = {}
    for key, value in postprocessed_tensors.items():
        outputs[key] = tf.identity(value, name=key)
    for output_key in outputs:
        tf.add_to_collection(output_collection_name, outputs[output_key])
    return outputs
这里会调用model中的文件,然后获得最后的输出映射,以字典方式存在
1
2
3
4
5
6
7
8
9
10
11
12
13
14
def _get_outputs_from_inputs(input_tensors, model,
                             output_collection_name):
    inputs = tf.to_float(input_tensors)
    preprocessed_inputs = model.preprocess(inputs)
    output_tensors,top_conv,norm_grads_cam = model.predict(preprocessed_inputs)
    postprocessed_tensors = model.postprocess(output_tensors)
    new_out = {}
    for key, value in postprocessed_tensors.items():
        new_out[key] = value
    new_out['top_conv1'] = top_conv
    new_out['grad'] = norm_grads_cam

    return _add_output_tensor_nodes(new_out,
                                    output_collection_name)
2.模型验证
这部分主要是编写好pb文件对应的输入和输出就可以
1
2
3
4
        self._inputs = self._graph.get_tensor_by_name('image_tensor:0')
        self._classes = self._graph.get_tensor_by_name('classes:0')
        self._topconv = self._graph.get_tensor_by_name('top_conv1:0')
        self._grad = self._graph.get_tensor_by_name('grad:0')
利用sess.run()运行得到实际结果,也可以再做下一步处理
1
2
3
4
5
6
7
8
9
10
11
12
13
14
    def predict(self, inputs):
        """Predict prediction tensors from inputs tensor.

        Args:
            preprocessed_inputs: A 4D float32 tensor with shape [batch_size,
                height, width, channels] representing a batch of images.

        Returns:
            classes: A 1D integer tensor with shape [batch_size].
        """
        feed_dict = {self._inputs: inputs}
        classes,topconv,grad =self._sess.run([self._classes,self._topconv,self._grad]
                                                , feed_dict=feed_dict)
        return classes,topconv,grad
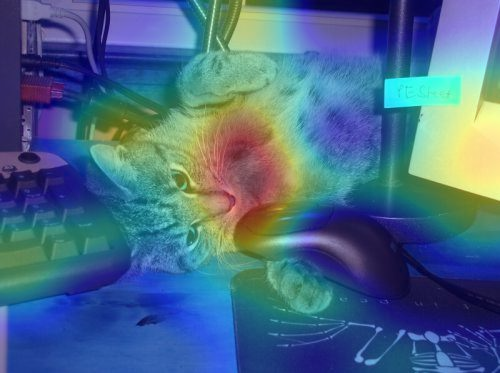
比如实现grad_cam
1
2
3
4
5
6
7
8
9
10
11
12
13
14
15
16
17
18
19
20
21
22
23
24
25
26
27
28
29
30
31
32
33
34
35
36
37
38
39
40
41
42
def grad_cam(self,output,grads_val):
        # cam的生成函数,输入单张图片的output值,还有反向梯度的值进行计
        output = output[0]
        grads_val = grads_val[0]
        weights = np.mean(grads_val, axis=(0, 1))
        cam = np.ones(output.shape[0: 2], dtype=np.float32)

        for i, w in enumerate(weights):
            cam += w * output[:, :, i]
        return cam

def generate_GradCAM_Image(self,save_dir,single_img,cam,save_name):
        if not os.path.isdir(save_dir):
            os.makedirs(save_dir)

        single_img = single_img.astype(np.float32)
        origin_img = copy.deepcopy(single_img)
        origin_img /= np.max(origin_img)

        cam = np.maximum(cam, 0)
        cam = cv2.resize(cam, (single_img.shape[1],single_img.shape[0]),
                               interpolation=cv2.INTER_CUBIC)
        cam /= np.max(cam)

        fig, ax = plt.subplots()
        ax.imshow(origin_img)
        ax.imshow(cam, cmap=plt.cm.jet, alpha=0.4,
                       interpolation='nearest', vmin=0, vmax=1)
        plt.axis('off')

        height, width, channels = origin_img.shape

        fig.set_size_inches(width / 100.0 / 3.0, height / 100.0 / 3.0)
        plt.gca().xaxis.set_major_locator(plt.NullLocator())
        plt.gca().yaxis.set_major_locator(plt.NullLocator())
        plt.subplots_adjust(top=1, bottom=0, left=0, right=1, hspace=0, wspace=0)
        plt.margins(0, 0)

        plt.savefig(save_dir + str(save_name) + '.png', dpi=300)
            # plt.show()
        plt.close()
        print("successed save "+ str(save_name) + '.png')
其中的topconv层就是事先预留出来的可以进行验证。通过反向求得梯度tf.gradients()
1
2
3
4
5
6
7
8
9
 with tf.variable_scope('Grad_CAM_Operators'):
            y_pred_softmax = tf.nn.softmax(y_pred)
            predicted_class_cam = tf.argmax(y_pred_softmax, 1)
            one_hot_cam = tf.one_hot(indices=predicted_class_cam, 										depth=self.num_classes)
            signal_cam = tf.multiply(y_pred, one_hot_cam)
            loss_cam = tf.reduce_mean(signal_cam)
            grads_cam = tf.gradients(loss_cam, top_conv)[0]
            norm_grads_cam = tf.div(grads_cam,
                  tf.sqrt(tf.reduce_mean(tf.square(grads_cam))) + tf.constant(1e-5))
3. Graph的改进和优化
这部分其实是我们再编码时,可以进行有习惯的variable_scope命名,这样得到的tensorboard图也就清楚很多
总之,多进行模块化命名
1
 with tf.variable_scope('Grad_CAM_Operators')
